 |
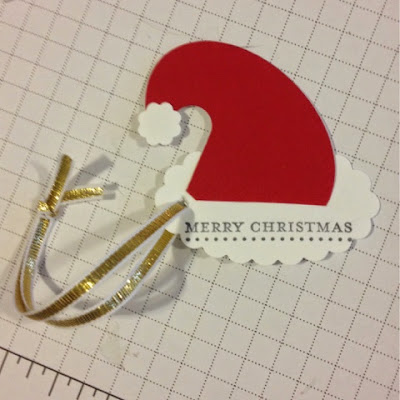
| Santa Hat Punch Art Gift Tag |
So, I'll share a little cuteness from last week. :-)
I made these tags to go with my gift card holder boxes. They're fairly easy (the tags, not the boxes!) and quick to pull together, perfect for you busy crafters out there!
I made these tags to go with my gift card holder boxes. They're fairly easy (the tags, not the boxes!) and quick to pull together, perfect for you busy crafters out there!
You need 4 punches:
the Large Oval, Scallop Oval, the 1/2" Circle and the Word Window Punches.
You'll need White card stock, Red card stock, and a ribbon or bakers twine.
To Make this Gift Tag:
the Large Oval, Scallop Oval, the 1/2" Circle and the Word Window Punches.
You'll need White card stock, Red card stock, and a ribbon or bakers twine.
To Make this Gift Tag:
- Punch your shapes: Punch out one Real Red Large Oval and one Whisper White Large Oval. Punch out one Whisper White Scallop Oval and one 1/2" Circle.
- Glue the two large ovals together, but only about halfway! (see photo)

Glue two large ovals together, but only halfway - Stamp your greeting onto the scallop oval. (optional) The hat part will cover the top portion of the scallop, so your greeting has to fit in the bottom half of the oval.

Optional Greeting - add to bottom half only - Take your Word Window Punch and position it as in the photo, angled upwards towards the top center - make sure this is the end of the oval that is glued together!!

Punch the glued end!! The bottom will need to remain open in the next steps. - Cut a slit in the bottom center of the scallop oval, about 1.25" long.

Slit will be approximately in the middle, and just over an inch long - Slide the larger oval into the opening, with the red side passing through the hole, the white side overlapping the back of the opening.
- Glue the ovals together on the back side. This serves two purposes - it adds some reinforcement to the tag; and it will provide a nice spot to write your To / From info!

Glued together, the white and red ovals meet to secure the scallop bottom part - Add the white circle to the tip of the "hat", trim excess from the point if needed.

Tah-dah! Cuteness! - Attach your ribbon or string, and add a To/From stamp to the back (optional).
- Attach to gift and give a loud HO-HO-HO!! (OK, that part is completely optional, lol)
Have a lovely evening!
I hope you got a few of those great Door Buster deals - if not, RUN don't walk to www.MidnightCrafter.StampinUp.net, and add some goodies to your cart before those deals disappear at Midnight (Mountain Time)!
:: Remember to checkout with the Hostess Code XMQKDG64 and enter to win the Everyday Occasions Card Kit I'm giving away! Every $25 spent using the Hostess Code will give you one entry into the drawing! More info on the giveaway is at the bottom of THIS POST. ::
Happy Crafting!
-Angie
No comments:
Post a Comment