Tie a... pink or purple or blue or yellow ribbon! Hershey Ribbon Tutorial

I was a participant in a fundraising boutique event this past weekend, it was to raise money for the breast cancer treatments of a local woman. I donated the Think Pink wreath I made to their raffle, and at my table I also gave out Pink Ribbon Hershey Kiss treats.
These were adapted from the great Hershey Ribbon tutorial by Brenda Quintana. I say adapted, because I wanted to make a great number to hand out and I found Brenda's tutorial to be more for a favor type treat, more substantial (and time consuming) to create.

I adapted it by making the ribbon thinner and longer, and assembling it in a little different order, and finally stapling and using regular snail instead of sticky tape:

Hershey Ribbon Treat - use for any cause, in your ribbon color

To start, choose a 8.5 x 11 sheet of card stock in your choice of color to match your ribbon type. Cause Ribbons come in a variety of colors, and these would be easy to make for Relay for Life, Autism events, or other cause events. I stamped a design on the right side of the cardstock, trying to keep things neat and orderly, but not perfect - #1. Then I cut the paper along the 11" side at 1/2" measurements - #2. This will give you 22 ribbons. Do not worry about the design being perfect along that edge, you can see in - 2.a - that even imperfect stamping is not horrible, it really does look fine. Be sure you choose an image that has lots of design elements - swirls, stars, writing - more of a background type of design. I then stamped a message, Take Care of Yourself in this case, along the blank side of the strips, facing the same direction as my background stamp -#3. I started my stamping about 1 finger width in from the edge to allow for the trimming of the ends of the ribbon. It makes it easier to read once the ribbon is folded, if you start your message on the left end and read it left to right normally.

Hershey Ribbon Treat - easy and quick to assemble, perfect for large gatherings or events

Holding your ribbon strip right side up - #4 , bring the right side around and under your left side #5. Then staple the two ends in the center - #6 & 6a. The edge of your message should end at the edge of your design strip, allowing space in the center to add the staple.

Hershey Ribbon Treat - add a message of your choice, or leave blank

Holding your ribbon with the loop at the top, trim each end with your scissors facing towards the top. Allow for your message to not get chopped off, and match the design side to this so the ribbon ends are of similar length. Swipe your snail across the bottom of a Hershey Kiss, and stick it into the center of your ribbon. Voila! Quick and easy, and minimal trimming and tape. These went together very easily, and I handed out about 60 of them.

You could, if you wanted, add a stamp with your info or your organizations info to the back of the ribbons. but these are simple little treats perfect to give out at a group event.

Thanks for visiting!
Happy Crafting!
-Angie

To Shop my Stampin' Up! online store, please visit www.MidnightCrafter.StampinUp.net
Find me on Facebook at www.Facebook.com/MidnightCrafting
And follow me on Twitter at www.Twitter.com/MidnightCrafter
Read More »

Color Me Autumn Accents

Autumn!! Leaves are starting to turn, and the days are getting shorter and
cooler!  These are a couple cards you could use for your Thanksgiving hosts, or to give to teachers or coworkers. Fairly easy, the hardest part is getting the die to ONLY cut the one leaf. Thus all the numerous variations. LOL


Mossy Meadow and Cajun Craze. Color Me Autumn Designer Series Paper from the Holiday Catalog. Autumn Accents Bigz die. Good Greetings sentiment stamps. Candy Dots. Stampin' Dimensionals.

Happy Crafting!
-Angie

To Shop my Stampin' Up! online store, please visit www.MidnightCrafter.StampinUp.net
Find me on Facebook at www.Facebook.com/MidnightCrafting
And follow me on Twitter at www.Twitter.com/MidnightCrafter
Read More »

All Is Calm Endless Wishes

Snowflakes!! I'd have every single set, if I could. (OK, maybe I do... no. On my wish list for sure!!) This is Endless Wishes - you should be sure you get this darling little polymer set before it goes away. Definitely one you'll find "endless" uses for!!


I used the All Is Calm Designer Series Paper from the Holiday Catalog, and Whisper White, Smokey Slate, Lost Lagoon, and Soft Sky card stock and inks. The accent color is Rich Razzleberry. I know, right?? Love it.

These were quick little cards, easy to make multiples if you were to choose them for your holiday cards, #justsayin. Hurry - get the set, its a keeper!!

Happy Crafting!
-Angie

To Shop my Stampin' Up! online store, please visit www.MidnightCrafter.StampinUp.net
Find me on Facebook at www.Facebook.com/MidnightCrafting
And follow me on Twitter at www.Twitter.com/MidnightCrafter
Read More »

Gorgeous Grunge Autumn Accents

Tried this card again using some of the other die cut pieces.. I am not sure which I prefer, the single leaf or this double leaf. Do like this layout though! 


Baked Brown Sugar and Crushed Curry, Autumn Accents Bigz Die, and Perfect Pennants stamp.

Happy Crafting!
 -Angie

To Shop my Stampin' Up! online store, please visit www.MidnightCrafter.StampinUp.net
Find me on Facebook at www.Facebook.com/MidnightCrafting
And follow me on Twitter at www.Twitter.com/MidnightCrafter
Read More »

Christmas Bliss Northern Flurry

I know Some places they're getting snow in October... Not here :-( California is very low on the snow so far!
Good thing I can get that snowy feeling with the Northern Flurry Textured Impressions Embossing Folder!!

These cards started with the embossing folder. Then I picked the All is Calm Designer Series Paper from the Holiday Catalog. And lastly picked the Christmas Bliss stamp set. I rotated the embossed base for each card. Kind of challenging to make each angle work, but it was fun. Snowflakes are my favorite! Ended up with a sweet suite of cards!


I used different card bases for each card, Smokey Slate, Whisper White, Pear Pizazz, and Lost Lagoon. You can tell I'm loving the pennant look here! ;-)

These may very well make the short list for Christmas cards this year!
Happy Crafting!
-Angie

To Shop my Stampin' Up! online store, please visit www.MidnightCrafter.StampinUp.net
Find me on Facebook at www.Facebook.com/MidnightCrafting
And follow me on Twitter at www.Twitter.com/MidnightCrafter
Read More »

Bright and Beautiful Gorgeous Grunge

Elegant and Grunge, not something that you'd automatically put together. But I think it works here, what do you think?


Coastal Cabana card base, and Coastal Cabana and Crushed Curry stamped with Gorgeous Grunge on the Whisper White background. The Bright & Beautiful star is stamped (stamp off first) in Crushed Curry and Die cut with the Stars Framelits. Perfect Pennants provides the matching sentiment, stamped in Smokey Slate.  The star and the white layer are both popped up with Stampin' Dimensionals.

I like this sentiment because it could be a birthday card, or a New Years card, an encouragement card, or a wedding card (a dream is a wish your heart makes, finding your prince charming...) A few different options... Change up the sentiment to the Christmas ones in the Bright and Beautiful set and it could work for Christmas... A pretty versatile layout -- I used it in the Autumn Accents cards too! Die Cut, background two tone inks, and sentiment!

Happy Crafting!
-Angie

To Shop my Stampin' Up! online store, please visit www.MidnightCrafter.StampinUp.net
Find me on Facebook at www.Facebook.com/MidnightCrafting
And follow me on Twitter at www.Twitter.com/MidnightCrafter
Read More »

Perfect Pennants Autumn Accents

Fall. Autumn. Cooler Weather, warmer clothes. Apple Cider, pumpkins, harvest moon...


For this card I used Baked Brown Sugar and Crushed Curry, stamped with Gorgeous Grunge onto Very Vanilla, for the background. I die cut a leaf from Very Vanilla with the Autumn Accents Bigz Die and scored it, then crumpled it up, then sponged some Crushed Curry and Baked Brown Sugar onto it. Perfect Pennants sentiment stamped in Early Espresso. Some bakers twine onto the leaf stem, and affixed if with Stampin' Dimensionals. The Very Vanilla layer is also popped up on the Baked Brown Sugar card base with dimensionals. 

In California, we know its Fall when Starbucks starts serving Pumpkin Spice Lattes!! LOL
Happy Crafting!
-Angie

To Shop my Stampin' Up! online store, please visit www.MidnightCrafter.StampinUp.net
Find me on Facebook at www.Facebook.com/MidnightCrafting
And follow me on Twitter at www.Twitter.com/MidnightCrafter
Read More »

Motlley Monsters on Halloween Street

Need a cute Halloween stamp, but don't want a whole set? The single stamp Halloween Street is for you! Happy Halloween just about says it all. And its priced right too!
For today's card I used Halloween Street stamp and the Motlley Monsters Designer Series Paper from the Holiday Catalog. It has such a good mix of patterns!! I also used the Confetti Stars Punch, which I am loving for tags and cards, its so dang cute!

Happy Halloween!! Halloween Street, Motlley Monsters, Confetti Stars by Stampin' Up!
I used a Bermuda Bay card base - did you know you can get pre-cut and scored card bases in a variety of colors?! What a time saver! And I layered the Halloween Street stamp, stamped twice in Tangerine Tango - once onto Soft Suede, and then again onto Crushed Curry. I fussy cut the yellow layer, I thought it gives it a spooky glow! Those two layers are popped up on the Bermuda Bay which has the Confetti Stars Punch across the top for a night sky effect. I added the pennants, scrap Designer Series Paper, to give a little more color. I don't make too many cards for Halloween, but when I do they need to be cute!

Happy Crafting!
-Angie
To Shop for these products, click the bold links above to go directly to that item, or browse my Stampin' Up! online store: please visit www.MidnightCrafter.StampinUp.net
Chat me up on Twitter www.Twitter.com/MidnightCrafter
and Instagram www.instagram.com/MidnightCrafter 
Halloween Street #136567


Motlley Monsters Designer Series Paper #135819


Cut and Ready Card Bases - variety of colors! 

Confetti Stars Border Punch

Read More »

Typeset DSP - Remember This Day

Kind of excited!!
I made this card for today:
Remember This Day - Typeset DSP,  Spiral Border Punch

It uses the Typeset Specialty Designer Series Paper - those little scraps you always end up with from projects; Very Vanilla cardstock for the base; the Spiral Border Punch, and the stamp sets Gratitude for Days (accents) and Project Life Holiday Cheer (sentiment).

And, ironically enough, I reached 500 Followers on Instagram today!! Definitely a day to remember!
Thanks to all of my followers, I appreciate the interaction and support!
If you're on Instagram too, find me at www.Instagram.com/MidnightCrafter

Happy Crafting!
 -Angie

To Shop my Stampin' Up! online store, please visit www.MidnightCrafter.StampinUp.net
Find me on Facebook at www.Facebook.com/MidnightCrafting
And lets be tweet-hearts nn on Twitter at www.Twitter.com/MidnightCrafter
Read More »

Think Pink - Clothespin Wreath

I have quite the stash!! Some of you may be aware of that as you have been in Midnight Crafting Central. Others of you, just take my word on it. Quite.The.Stash.

I was going to continue cleaning my craft room today. My BFF took my kids - all 3 - to an awesome Pumpkin Patch. By Herself. All Day. That is why shes known as Krazy Kristin! hahaha... But seriously. Mr Man and I went out to brunch, saw a movie, came home and cleaned a bit, and they still were not home!! So I was going to clean the craft room... but then I came across my clothespin stash, and thought of a great raffle item for a Breast Cancer Awareness Fundraiser I'm attending later this month.

You know how that goes!
My afternoon became a CRAFTernoon, and I made this:


I'll admit, I kind of love it. I might have to make some more. 
{because I have enough stuff in the stash to make a half dozen, but we won't go there...]


The pennants are from the Stampin' Up! Sale-a-Bration 2014 Heartfelt Banner Kit, which is retired. The words were cut out on my Silhouette Cameo. The butterflies are made with the Stampin' Up!  Elegant Butterfly Punch and the Bitty Butterfly Punch. I used the Silver 1/8" ribbon to string up the pennants. And Basic Jewels Pearls and Rhinestones to embellish. The paper embellished clothespins are a mix of retired Designer Backgrounds Paper Stack colors with Rose Red. 


If you're in the area, I'll be putting this in the raffle at the Boutique Fundraiser Event in Newman. Saturday October 25th from 9am - 5pm. Come and say Hi! Stay and shop & try to win one of the raffle prizes! I'll be there selling Halloween, Thanksgiving, and some Christmas goodies.

Hope you're having a great weekend!
Happy Crafting!
-Angie
To Shop my Stampin' Up! online store, please visit www.MidnightCrafter.StampinUp.net
Find me on Facebook at www.Facebook.com/MidnightCrafting
And follow me on Twitter at www.Twitter.com/MidnightCrafter
Read More »

Chalk Talk Change Up

This week, my MOMS Club held their annual Emergency Services Appreciation Picnic for the local law enforcement, fire departments, and ambulance company. Its always a fun afternoon!! The kids love seeing the trucks and equipment used, and the Emergency Service people seem to enjoy sharing their afternoon with us.

One of the exciting parts of our afternoon, the Sheriffs K9 Demonstration 
This year, our fabulous Membership VP asked for donations from local businesses to raffle off (free tickets with attendance) for the Emergency Services members. Wow! Did our hometown and area businesses come through! Generous donations allowed us to raffle off gift certificates for lunches, dinners, golf, a photo shoot, movie tickets and baskets of goodies!  We also received donations of food and drinks to serve at the picnic! It was awesome!!

So onto the crafty part!! LOL
I made some certificate holders with the Envelope Punch Board, as we got gift cards and gift certificates in various sizes, but we wanted them to be easy to hand out. I had started to cut and prep for them...when I remembered that our theme colors were Red White and Blue. Dangit!! So I changed it up and made these red white and blue ones to use.
Silhouette Cut Thank You, Various Blue cardstock and DSP, Real Red Accents.

But I still had some envelopes cut already, in other colors. What to do?! Waste Not, Want Not:
And that is how you get today's project!!
Gift Certificate Holders - 9x4.5" to accommodate various size certificates
I had some Mossy Meadow and Pear Pizazz envelopes trimmed out - gotta love the Envelope Punch Board which can create envelopes in up to 63 different sizes!! Woot!
For these two samples I used the Color Me Autumn and the All Is Calm Designer Series Paper sets. I used the Chalk Talk stamp set to match the color combo, and just die cut the tags with the coordinating Chalk Talk Framelits.


I like these, and will probably make more, as they are super easy! Pretty handy for those 8x11" or odd size certificates. Maybe for a Thanksgiving hostess gift, certificate for dinner where she Doesn't have to cook? ;-) A letter and a gift card? Tickets to a game or play? Custom wedding or birthday invitations, invites that you want to use a certain theme paper for... Use up that scrapbook paper making envelopes for Happy Mail, or gift card holders? There's no end to the uses for these envelopes! I LOVE the Envelope Punch Board! Trust me - USEFUL. And versatile - boxes, bows, clever little projects out there on the Internet... addictive!

Enjoy your weekend! Wishing you some Cre8time!!
Happy Crafting!
-Angie
The AWESOME Envelope Punch board is only $19.95 in my Stampin' Up! online store, Shop Now at www.MidnightCrafter.StampinUp.net  or click the bold link above.
Find me on Facebook at www.Facebook.com/MidnightCrafting
And lets be Tweet-hearts at www.Twitter.com/MidnightCrafter
Read More »

Endless Wishes for All is Calm

LOL All is Calm. Only when my babies are all sleeping!!

Today's card, though, uses All is Calm Specialty Designer Series Paper with the Endless Wishes stamp set. I love the color palate in this Designer Paper. Cool wintry softness. I bought this set to make our Christmas cards, snowflakes are my favorite. These might be in the stack of ones to mail off this December!

Endless Wishes in Lost Lagoon and Pear Pizazz, Silver Encore Ink

Endless Wishes and All is Calm, Lost Lagoon and Pool Party

Are you crafting for Christmas already? I sure am!!
Happy Crafting! -Angie

For these supplies, click on the link of the product name above. To Shop my Stampin' Up! online store, please visit www.MidnightCrafter.StampinUp.net
Find me on Facebook at www.Facebook.com/MidnightCrafting
And lets be Tweet-hearts on Twitter at www.Twitter.com/MidnightCrafter
Read More »

Babys First Fun Frames

Babies. I know. MORE Baby cards... It is what it is, folks.

Today I used Something for Baby stamp set and Babys First framelits (available as a bundle for additional savings, oh yeah!) and tried a few combinations with Fun Frames and Perfect Polka Dots Embossing folders. I used Crushed Curry for the wittle ducky, and the Regals Backgrounds Designer Series Paper Stack for the frame papers. The Hello Love stamp is from the Good Greetings stamp set.


Happy Crafting!
-Angie

Get these, and other crafty goodness, at my Stampin' Up! online store, please shop now: www.MidnightCrafter.StampinUp.net 
Find me for fun on Facebook at www.Facebook.com/MidnightCrafting
And be my Tweet-heart on Twitter at www.Twitter.com/MidnightCrafter
Read More »

A Fitting Occasion - Baby Cards

Yes, More baby cards. You'd be surprised at the number of pregnant women I know! ;-)

A Fitting Occasion stamp set is a pretty fun set! Its good for many uses, from baby to birthday, and will work hard for you in card making, memory keeping, and gift cards and tags.

I made a set of baby cards. These are Congratulations cards for the most part. I like the different rings of words and the big selection of center images! Fun!! I tried to use images that went with the type of card, but used the sweet crown for all of them. Every baby is a sweet prince or princess, right??

This the basic layout. I used Gorgeous Grunge with a kind of mono-chromatic color scheme. Blushing Bride with Pink Pirouette for the background ink. Below you can see where I experimented with the Pink in the center image, but I decided I needed the darker accent. The neutral card uses Wild Wasabi and Pistachio Pudding. For the boys I used Tempting Turquoise with Soft Sky background ink.  The base is Very Vanilla for all. The Thick Bakers Twine on all the cards is from the In Colors pallet, but matches well on the Vanilla background with the lighter ink and the popped up darker ink circles.
A Fitting Occasion - Girls Card
A Fitting Occasion - Neutral Baby Card
A Fitting Occasion - Boys Card

Happy Crafting! 
-Angie

Get your own set of A Fitting Occasion in my Stampin' Up! online store at www.MidnightCrafter.StampinUp.net

Find me on Facebook at www.Facebook.com/MidnightCrafting
And check out my tweets at www.Twitter.com/MidnightCrafter
Read More »

Something To Say - Autumn Ombre

Trying to find a fall combo of oranges proved to be.. Not hard at all! Always nice when a color combo just falls into place. I liked the Basic Grey background and the softness of the Very Vanilla to lighten it up. I used the Thank You from Something To Say, and the flower punch from the Itty Bitty Punch Pack. I could not decide between the Pearls or the Candy Dots, and posted to Facebook to see what others thought. Overwhelming vote went to the Pearls. I must say I am still partial to the candy dots, but maybe I'll try a mix on the next card. Or just go with the pearls! I plan to make a set of these to donate this week. :-)

Something To Say - Candy Dots - Scallop Oval
This one with the Candy Dots used a little darker Scallop Oval, the Tangelo Twist. The stamp is done in Cajun Craze. The colors I used are Pumpkin Pie, Tangelo Twist, and Cajun Craze, on a Basic Grey and Very Vanilla base. ((shhhh, the 1/8" Pumpkin Pie Taffeta Ribbon is retired. You could sub in the 3/8" Tangelo Twist Stitched Satin ribbon.))

This one wins in the polls!
Pearl accents with Something To Say and Itty Bitty Punch Pack.
Thank you for voting, and thanks for visiting today! Other Autumn card posts can be seen HERE.

Happy Crafting!
-Angie

Find these supplies in my Stampin' Up! online store, please visit www.MidnightCrafter.StampinUp.net
Find me on Facebook at www.Facebook.com/MidnightCrafting
And be my Tweet-heart at www.Twitter.com/MidnightCrafter
Read More »

Color Me Autumn

World Card Making Day 10/04/14


Color Me Autumn Designer Series Paper from the Holiday Catalog, Autumn Accents Bigz Die, Autumn Wooden Elements 

Happy #WCMD Crafters! 
-Angie


Read More »

World Card Making Day 2014

It's here!! There are a TON of contests out there, I'll start with the one Stampin' Up! is sponsoring!
Six HUNDRED and Seventy Five dollars worth of stuuuuuffffff from over 30 manufacturers!!!!!!!
Come to mama!! Oh. Ahem. I mean...

 Good Luck to you all!!! ;) 

Read the rules and get the submission guidelines and address at 

Happy Crafting!
-Angie
Read More »

Artisans Craft Fair Recap

Last weekend I was pleased to participate in the Artisans Craft Fair, presented by Grace Co. Handmade as a fundraiser for her 2015 mission trip to Carrefour, Haiti.


It was a gorgeous day for an outdoor craft fair! We were not using pop-ups, so I had to come up with an alternate way to hang my banners. This was a fun challenge, made easier with the help of my master-builder friend Kristin, and my handy hubby! I think the end result was good, and with some tweaks might be a great display for me! We looked at a few ideas online, but came up with this final idea thanks to Kristin. I used 2 8ft closet rods with clothespins attached at 1 foot intervals, and some jute cord. The bases were these big 12x6" wood remnants from the lumber store, that Mr. Man so helpfully drilled with holes for me. I took some bricks to add if the wind picked up, but the stands worked just fine, and they were not so heavy that I couldn't set them up myself. The posts are not fixed in the bases, so its easy to dis-assemble and pack up.

These are the banners I took:

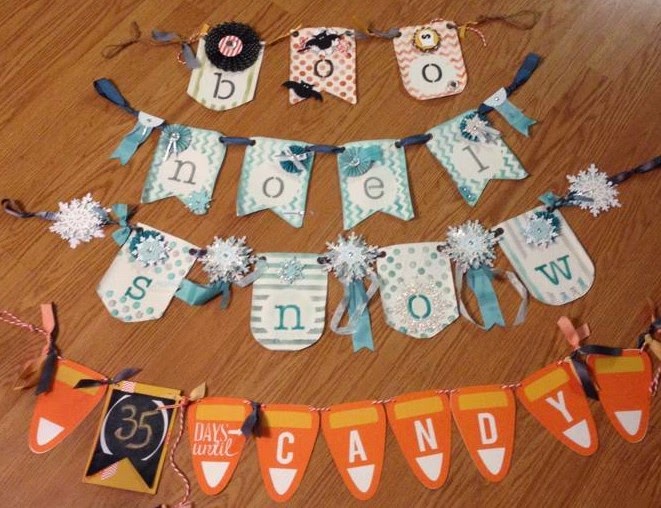
Handmade Holiday Banners MidnightCrafting.com
Simply Created Canvas and Chalkboard Banners
 The Boo Banner is hand inked canvas, with paper accents. I used bat punch art, and a little ghost to spook it up. The Noel and Snow banners are also hand stenciled canvas, with ribbons and rosettes and some snowflake ornaments made of paper. The Countdown to Candy is made of paper with a chalkboard pennant and a hanging piece of chalk to help you count down to Halloween.

***To make your own banners like the ones above and below, you can purchase supplies like the Simply Created Build A Banner Kit and the Chalkboard Banner Simply Created Kit. I also used elements from Ribbon and Trim, and fabulous Stampin' Up! Cardstock. www.MidnightCrafter.StampinUp.net If you would like to purchase a banner from me, pre-made or custom, please contact me to discuss your project! MidnightCrafter at Gmail dot com***

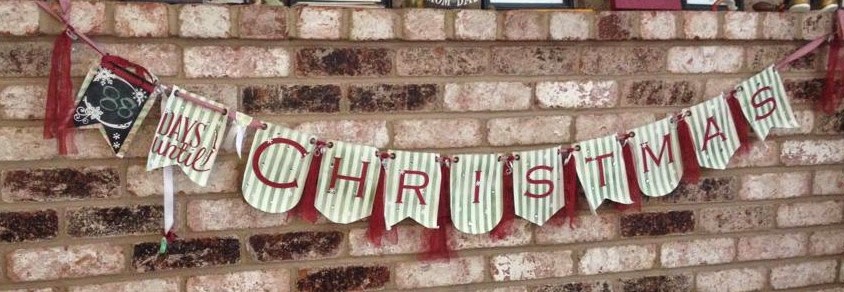
Handmade Christmas Banner MidnightCrafting.com


The Countdown to Christmas banner is made with the hand stenciled canvas, paper die cut letters, and a chalkboard pennant accented with vinyl snowflake cutouts. I also included a hanging piece of chalk to keep track of the sweetest season! 

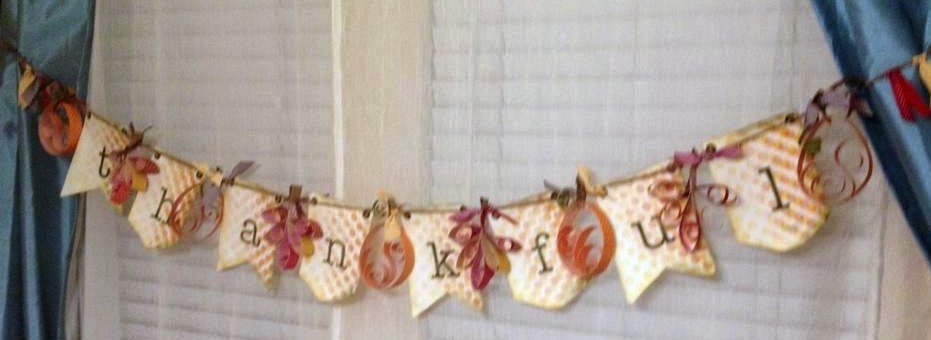
 Handmade Thankful Banner MidnightCrafting.com

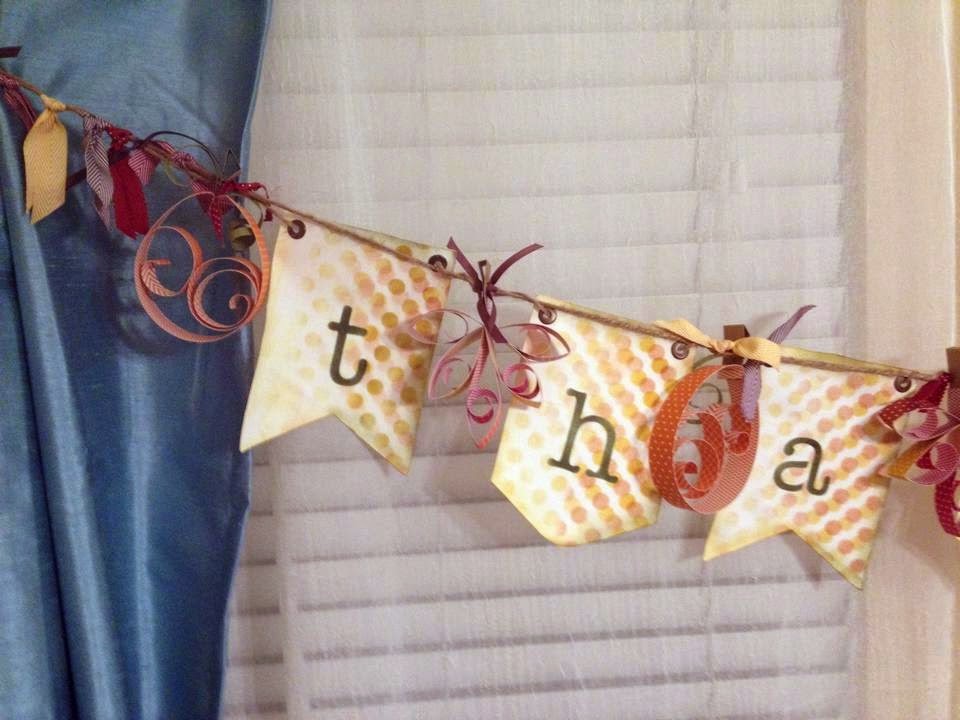
Handmade Thankful Banner MidnightCrafting.com

 The Thankful banner was definitely a work of heart. I hand stenciled the two-tone background and letters. The leaves and pumpkins were all evolutions of my earlier garland paper art pieces. I love the combination on this banner, and was Thankful for all the attention it got at the fair. Definitely one I will have to make again for my home.

Participating in this fair as a crafter rather than in my usual Stampin' Up! Vendor mode was both scary, and educating. I know how to share my love for the great Stampin' Up! products I sell, its hard not to rave about the benefits and qualities of my favorite stuff! But giving glowing reviews of my own handmade work seemed a little boastful... I was not quite sure how I would interact with people.

All I knew as I went into it was that I loved making the items I brought! It had been so nice to make things that I've wanted to make, for so long, but haven't made the time!! It was different than deciding what product I could feature, which promotion I would showcase, and how to display and convey information. I did play with my display, I used my suitcase again, and my wooden crates. My tables were set up a little different, and I had an umbrella to shade my chocolates - oh the CHOCOLATES!! It was an adventure, I really had no expectations other than a pleasant exercise in crafting.

It ended up being my most enjoyable outing to date!! On several levels! I took my daughter with me this time. She looked forward to it, asking me every day - "How many days now, until I get to go with you to the craft thing??" It was the last afternoon I got to spend with my friend & fellow crafter, she actually moved away the following week. And I loved seeing peoples reactions to my treats and creations. Seeing the joy someone feels when they buy a gift for someone, and hearing all the stories of who would be getting the gifts. SO heartwarming! And they bought ALOT of gifts!! Whats not to like about that!

I really felt a different welcome from the other Artisans, and the customers who came through the fair. All seemed more open to and appreciative of hand made items - something that I find sadly lacking in many of the Vendor events I attend. Handmade is a different horse. I guess it was hard for me to separate the two in my own mind until I had experienced this craft fair. I had wondered at the disinterest and highly varying success rates at other shows. I now recognize this was most likely due to that 'handmade' quality. People at vendor fairs are not always the same people who appreciate or create handmade items as gifts, part of a hobby, or as a business. They can be!! But in my experience, not so much. I now know to do better research, how to better blend in or separate my Stampin' Up! sales side, and to find events that will be more enjoyable and successful for me. And I need to spend more time with hands on creating. Being a Maker. It really is what I enjoy!!

Perhaps when my own mini-makers have grown a little more, I'll make room (and have more energy) for more making! ;-) #momlife
Happy Crafting!
-Angie

To Shop my Stampin' Up! online store, please visit www.MidnightCrafter.StampinUp.net
Find me on Facebook at www.Facebook.com/MidnightCrafting
And follow me on Twitter at www.Twitter.com/MidnightCrafter
Read More »